VxFM-Replacing a node using VxFM
Summary: This article gives the procedure to replace the faulty node with a new node through VxFM.
This article applies to
This article does not apply to
This article is not tied to any specific product.
Not all product versions are identified in this article.
Instructions
Goals
To replace a faulty node using VxFM.
Facts
VxRack
VxFLEX Appliance
VxFlex Manager
Solution
Before you start
- Make sure that you have the VxFM IP address and the credentials and have permission to modify the service.
- Copy the network details (Sio-mgmt-ip, Sio-data1-ip, Sio-data2-ip (SDS ips), esxi-mgmt-ip, data1-ip, data2-ip (SDC ips), and Vmotion ip) of the faulty node. Also copy the MDM role of the faulty node.
- Make sure that you have a new node with iDRAC IP configured and discovered in VxFM as managed mode.
NOTE: If you want to use the same iDRAC IP of the faulty node, skip this step#3 for now and continue with below.
Procedure
- Open a web browser and enter the VxFM IP in the URL.
- Enter the username and password.
NOTE: If you do not have the username and password, please contact the Dell customer support.
- On the mega menu, click Services.

- Under All Services, click the service which contains the faulty node.
NOTE:
- If the faulty node is a primary MDM or secondary MDM, then switch the MDM role from faulty node to a good node. How to failover Primary MDM to Secondary MDM on VXRack System 1000 Flex
- Make sure that the faulty node is no longer master or secondary MDM.
5. Under Service Information, click Delete Resources.

The Remove Resource page is displayed with the list of physical nodes.
6. Select the faulty node from the list and click Next.

The Remove Resource pop-up window is displayed.
7. From the Resource removal type drop-down list, select Delete Resource.

The Delete Resource pop-up window is displayed.
8. Enter the below text in the text box and click Delete:
DELETE RESOURCE
Wait for the job to complete.
NOTE: You can monitor the job status under jobs in the header.

9. Do the following steps to remove the node from resource pane:
- On the mega menu, click Resources.
The Resources pane is displayed.
Under All Resources, select the node that is faulty, and it is deleted from service.

- Click Remove.
- Click Yes.

The selected resource is successfully removed from the discovery pane.
- Do the following steps only if you want to use the same iDRAC IP of the faulty node for the new node:
- Remove the iDRAC configuration of the faulty node that is deleted.
- Configure the iDRAC of the new node with the same IP address as of faulty node that is deleted.
- Discover the new node in VxFM as managed mode using the iDRAC IP.
- Under the Service Information pane of the selected service, click Add Resources > Node.

The Duplicate Node pop-up window is displayed.
- From the Resource to Duplicate drop-down list, select the node for replication.
13. In the Number of Instances box, enter the number of nodes to add.
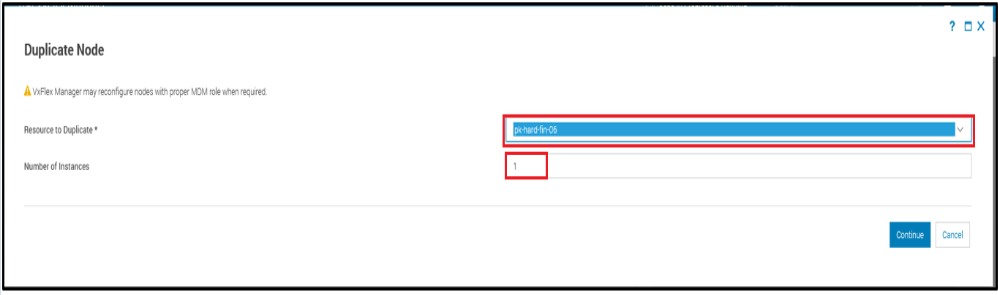
14. Click Continue.
The Component Name pane opens.
15. Configure the following parameters:
| Parameter name | Description | Value and ranges |
|---|---|---|
| OS Settings | ||
| IP Source | This parameter gives the source of the IP. NOTE:
|
|
 |
||
| SVM OS Settings | ||
| SVM IP Source | This parameter gives the source of the SVM IP. NOTE:
|
|
 |
||
| Hardware Settings | ||
| Node Source | This parameter gives the source of the node. |
|
| Node Pool | If the new node is part of any node pool, select the appropriate node pool from the drop-down list. If the new node is not part of any node pool, then select manual entry option to manually choose the node. |
Select from the drop-down or enter manually. |
 |
||
- Click Save.
- In the Summary page, click Finish.
Wait for the job to complete.
Affected Products
StorageArticle Properties
Article Number: 000206458
Article Type: How To
Last Modified: 03 Jan 2023
Version: 2
Find answers to your questions from other Dell users
Support Services
Check if your device is covered by Support Services.